Using Cavalletti effectively

Cavalletti work is an excellent way to strengthen your horse

Cavalletti work is an excellent way to strengthen your horse. Image via Equisearch.com

Cavalletti exercises are excellent for helping your horse develop rhythm, build his topline, gain confidence over obstacles and become a better athlete.

When I first got Freedom I used them extensively because he had absolutely no trot. He was the proverbial sewing machine — trotting up and down going nowhere at a million miles per hour. Of course, for a racehorse, that’s not unusual. They don’t train at the trot, so it’s never fully developed.

Using trot poles on the ground helped him understand that I wanted a completely different gait, one with suspension, one that covered ground. I started with just one pole and eventually I worked up to six in a row. Today he has an amazing trot. He has a trot lengthening to die for. He (and I) just didn’t know he had it in him.

Years ago I also used trot poles and raised cavalletti to teach my horse Bogie how to do a lengthening. Bogie was a Quarter Horse mix. He didn’t have much suspension and he had a longish back. Cavalletti exercises did a lot to make him stronger. He never had a showy trot, but he definitely improved.

How to use Cavalletti

The big trick with ground poles or Cavalletti is proper placement. If the poles are too close together you will cause the horse to shorten his gait; too far apart and it will cause your horse to rush or become unbalanced.

You should always start your horse over distances that are natural for your horse. Once you’ve established rhythm and balance with this spacing, you can adjust the distances to enable training. Increasing the distance between the poles can help your horse build the strength to hold a trot lengthening.

  • Start with one pole. Once your horse can walk/trot/canter over that pole then add a second. Add the poles gradually because it takes a lot of strength for your horse to hold himself over the exercise.
  • For work at the walk, place poles 3 feet apart, starting with poles on the ground.
  • For work at the canter, start with the poles 9 feet apart, also on the ground.
  • When your horse is comfortable with this distance and no height, then raise one side of the poles without changing the distance.
  • You can begin to increase the distance between the cavalletti once your horse is moving rhythmically through the series. This will help your horse build the strength to sustain suspension.
  • Cavalletti work is very tiring for horses. Make sure to take breaks and do not overdo the exercises.
  • Every horse is different. Be prepared to adjust the distances to suit your horse.
  • It’s much easier to set up cavalletti when you have someone on the ground to help you. Otherwise you’ll be hopping off your horse every time he knocks a pole out of position.

Here’s a useful video demonstration:

Some fashionable horses

Every once in awhile I’ve seen horses used in ads for high fashion. Now someone has collected these images on a single blog — La Cavalier Masquee. Some of the photos are truly beautiful; other show a true lack of reality. I guess the good news is there are none of Katie Price (Jordan)!


Freedom gets his racing stripes.

I’m a big fan of trace clipping my horses. Freedom gets very excited when we are out hunting. He can work up quite a lather and I’m afraid that he’ll get chilled as he cools down. The trace clip is just about ideal: it takes off enough “fur” to keep him cool but leaves enough of his coat to keep him from getting too cold.

Freedom is very good about clipping. He stands like a statue even when I clip him outside. Just as well as I’m not all that good at it. I’m just glad you can’t see both sides at the same time!

I get a lot of questions from passersby after I clip. People always want to know why my horse is two colors. I tell them they are his racing stripes.

Freedom with his trace clip. When people ask me why my horse is two colors I always say he has racing stripes.

Troxel puts the focus on safety – Send your entry to their photo contest

Send in your favorite photo of a Troxel helmet.

Troxel has found a new way to focus on safety. The helmet company has done an outstanding job of bringing out helmets that are both safe and trendy. Now they want to see how you focus on safety.

Send your favorite photo of you (or someone you know) wearing a Troxel helmet and you could win some great prizes.

Read more.

More on Mary Wanless

Mary Wanless teachingI just found another local blogger who also audited the Mary Wanless clinic.  Cool to get another opinion and discover what stood out to her.

Lee Cullen, who writes Confession of a Struggling Dressage Rider, wrote:

Yesterday, I audited the Mary Wanless clinic at Larkspur Farm in Littleton, Massachusetts.

So…what did I think? I enjoyed it but I thought it was more beneficial for the riders then for the auditors. Don’t get me wrong. I took things away from it that I can pull out of my trunk and reference in the future such as bearing down and plugging in. Riders share a trunk load of common faults but I felt that the clinic was very rider specific. As it should be for the kind of money they’re paying to ride in it.


Many of the riders were hollow backed and sitting too hard on the down portion of the posting trot. To solve this Mary would pull back on their waistbands. They were to think about flattening their backs. I prefer thinking “Belly button to spine.” Almost all of the women needed to tuck their bums under them…ahem, that would be me. A little junk in the trunk you know. Oops. Sorry, I digress. In the posting trot they tended to sit down far too hard…again that used to be me. Mary had the riders thinking that the saddle was very hot and they’d get burned if they sat on it. I liked that. I was taught “Touch, you’re up.” Remember if your horse is rounding and offering you his back, that’s an incredible gift and we don’t want to squash it like a bug beneath our bums!

I also liked the idea of an arrow protruding out from the center of your chest. This particular rider was really twisted to the right on a circle. (Ah, how well I know this particular nemesis.) Mary said that the arrow should be pointing in the direction of travel. This particular rider was NOT allowed to look to the right and needed to really exaggerate bringing her left shoulder and hip back. Basically closing the left outside rein to control the withers and contain the haunches. I have to admit that reading about circles in Ride with Your Mind Essentials really helped me. I think that I’d rather use that arrow to shoot the scary monster lurking near E.

Another analogy I loved was to imagine laser beams shooting out of your knees down toward the ground. Correct rider position is kneeling in the saddle. By thinking about this we’ll open the angle at the back of our knees. Okay. Once again I’d rather use the laser beams to blaze a path in front of my horse past scary letter E. I really have to stop watching the Sci Fi channel.

During the lunch break I bought a new book for my collection and had it autographed! Mary will be returning to Larkspur Farm in May 2010 if you’re interest in riding or auditing.


Forget heels down. Think knees down!

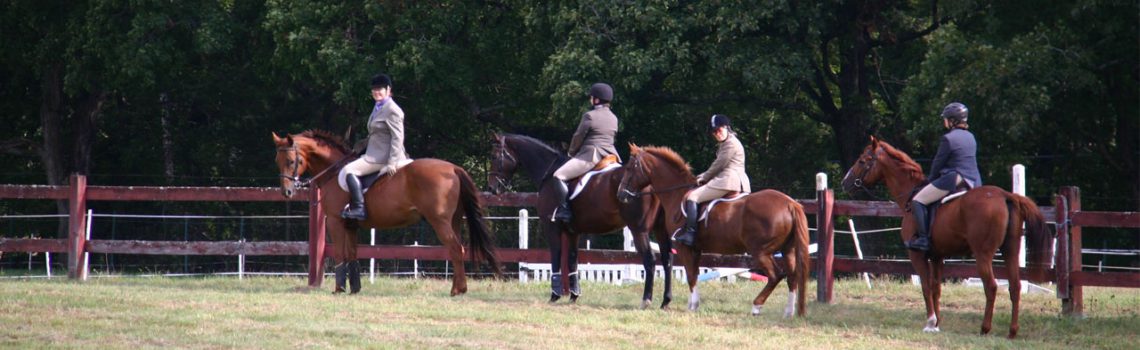
On Friday I audited a Mary Wanless clinic. I’ve read her books and have taken a few lessons with someone who trains with her. Hearing her explain her theories and work with the riders made it all much clearer. For those readers not familiar with Wanless, she specializes in rider biomechanics, helping riders find the right balance point so they can work with their horses rather than against them.

I also remembered a few things that I used to know. Funny how that happens.

The first thing that I remembered was how much the position of your knees influences your seat. When I was a kid learning to ride, I think that I must have heard “heels down” from various instructors a few thousand times.

The problem is that forcing your heels down tends to put the rider behind the motion in a catch up or water skiing position.

While I was watching the clinic I saw it happen to several riders. They forced their heels down and leaned back. When they did this even slightly, you could see how their weight shifted and they fell against the back of their saddles.

Instead of concentrating on their heels, you need to think about your knees. By pointing your knee caps down, you open the angle of your hip and are able to sit in a balanced or neutral seat. Mary Wanless said that you should think your of your knee as being the point of an arrow head shape. That’s not to say that you should let your leg pivot back from your knee, or that your heel should be up, but rather that you need to make sure that your lower leg and and foot stays in the direct line under your pelvis and your heel should be in a neutral or slightly down position. She said to several riders that your riding position should be such that if your horse disappeared from under you that you would land on your feet.

The concept of pointing your kneecaps down was first suggested to me by a trainer in Cleveland. She always told us to envision kneeling on one of those ergonomic kneeling stools which were designed to help you find your natural balance line from your ears to your shoulder, down through your hips to your ankle. This position relieves compression of your

Envision yourself on one of the ergonomic kneeling chairs.

Envision yourself on one of the ergonomic kneeling chairs.

spine and reduces tension in your lower back and leg muscles — all things that are also good for riders.

In fact, when riding with your kneecap pointed down it prevents you from sitting in a “chair seat”; a position that occurs when your thigh bones become too horizontal.

When I rode with that trainer I made a concerted effort to ride with my kneecaps down. It helped me position my seatbones so they were pointing down and made me feel more “plugged in” to my horse. Over time I guess I’ve drifted away from the ideal because when I tried it again this weekend I was amazed by how much I had to stretch my hip flexors to accomplish the position. This is definitely something I need to practice!

Additional Resources:

Biomechanical Riding and Dressage Website

PSA: Ivermectin Toxicity in Dogs

Herding dogs, such as Australian Shepherds, frequently are highly sensitive to Ivermectin.

Most of us who have horses have Ivermectin in our barns. It’s probably the most common de-wormer out there. But did you know that Ivermectin can be toxic to dogs?

I never knew this, but it’s something we should all be aware of, especially because many people use Ivermectin to treat heart worm and mange in dogs and might not think twice if Rover laps up some of it next time you worm your horses.

Most of the time toxic reactions occur when a dog ingests 10-20 times the recommended canine dose. However, some breeds are highly sensitive to Ivermectin and a fatal dose can be quite small. The drug is particularly toxic to herding breeds such as Collies, Old English Sheepdogs, Shetland Sheepdogs, Australian Shepherds, Border Collies, and Shelties. Also affected are Jack Russell Terriers. There’s even a rhyme for veterinarians about Ivermectin: “White feet, don’t treat.”


Even if you’re careful with medications there are many ways that a dog can ingest Ivermectin such as picking up a used tube out of the garbage or licking up medication that a horse has spit out onto the floor. I have a dog that would certainly go after anything that he thinks looks edible and in retrospect I think I’m just lucky that he hasn’t eaten any becuase it just hasn’t been on my radar screen.

Signs of Ivermectin overdose.

Reaction to Ivermectin generally occurs within 4-8 hours of exposure and includes:

  • Dilated pupils
  • Depression
  • Excessive drooling
  • Vomiting
  • Tremors
  • Disorientation
  • Weakness
  • Recumbency (inability to rise)
  • Weakness
  • Blindness
  • Nonresponsiveness
  • Slow heart rate
  • Lack of appetite
  • Stupor
  • Slow respiratory rate
  • Coma or death
  • Seizure

What should you do?

If you suspect Ivermectin poisoning the first thing you should do is call your vet.

If it’s only been a few hours you can also induce vomiting (which can be done with hydrogen peroxide) or feeding activated charcoal. Because Ivermectin persists in the body for several days and keeps returning to the gut before being excreted in feces, giving multiple doses of activated charcoal can speed recovery by actually decreasing the dose of drug that the dog receives.

There is no way to reverse Ivermectin toxicity so the only treatment is supportive care which may be better provided by your veterinarian.

Many dogs do recover from overdoses of Ivermectin but sadly, others do not. Keeping your dogs away from Ivermectin is the only sure strategy of preventing an overdose.

Now, that’s the way to win a Marathon!

TS-Marathon-Winner-article_large.article_large

You have to love The Onion!

New York Marathon Winner Tests Positive For Performance-Enhancing Horse

NEW YORK—Officials from New York Road Runners stripped American Meb Keflezighi of his 2009 ING New York City Marathon victory Wednesday after a blood sample taken from his fetlock was found to contain high levels of performance-enhancing horse.

Read more.